Images in React-Native
Images
Local storage images with React-Native
I will run these code examples in the App.js file, this is an easier way to practice code and see what any alterations do. The return method displays the commands added to it. Safe Area View is an iOS specific command that creates enough padding to avoid the speaker and front facing camera on an Apple phone. You might have noticed media streaming content that does not use the safe area view and cuts of a section of the image or video you might be viewing on the phone. It's only a small section but can become really annoying.
React-Native Style Sheet
The style sheet is needed before adding any images, this allows us to control the image dimensions. The Style sheet API is imported from react-native, this then allows us to create a style sheet container. Best practice is to have a separate style component that gets called into the functional component but for the sake of these examples I will create it at the bottom of the page (Which is also acceptable in certain components) the container dimensions are set in the Style sheet component, this sets the size of the image when it is displayed and controls its dimensions. Finally we set the style of the Safe area view by calling the container style.
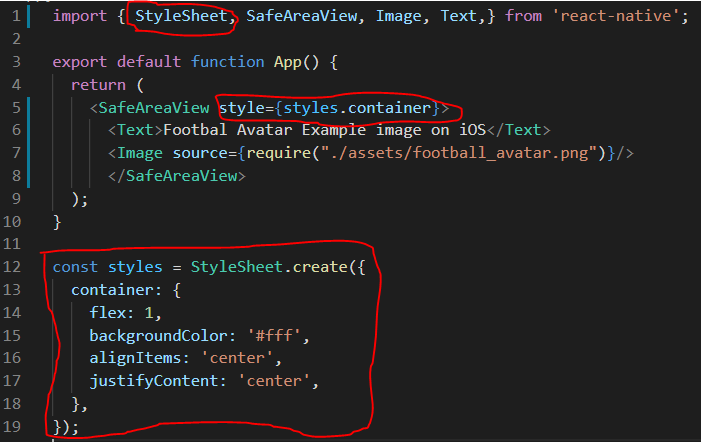 |
| Style sheet example |
By storing images in the Assets folder, we can use the
Image source={require("File path")}/>
to call that image to be displayed. In this example below I have used the football_avatar.png image that is stored in the Assets folder of the application and displayed on an iOS device. When the require function is used, React-native packager will include the image in the bundle. This means that application size will increase with every image required. It is recommend to only use static images only if they are needed to be shipped with the app.
 |
| Code for local storage Image |
Result on iOS device
Network images in React-Native
For the network images I used a random image form picsum. Lorem picsum generates a random open source image. The require function is no longer needed for network images and an object is passed instead. This object has a property called uri: and is set to string. React-Native wont display a network image without setting the dimensions inside the component. This is allowed with local images because the require function reads the meta data for the images. In the object that is passed to the source prop we set two extra properties of width and height. This adds the dimensions of the image and allows react-native to display the image correctly.
 |
| Code for network image |
 |
| Image from Picsum Taken form iOS Device |
The image component has a number of props that can be used for example blur radius will blur the image to the degree in which it is set. Loading Indicator source allows an image to be displayed while the actual image is being downloaded. Some props are framework specific like the fade duration prop that is only supported by android, it loads the image with a fade effect that can be changed to set how long the fade in will take to load in the image. In the next post I will go through the steps used to make an image touch responsive.

just the info i was looking for!
ReplyDelete